Saturday, December 26, 2015

14. Hatch That Duck!

Realized we could go ahead and install the hatch at the rear of the kayak before taking a break for the week. The hatch spacer is used as a template to cut the hatch opening.  Tracing around the inside of the spacer you have a line to follow. Some will use power tools for this cut, I opted to use the Japanese Bonsai saw. The saw was easy to handle, looking more like a steak knife than a saw.  It leaves super thin kerf which equals a beautiful cut.
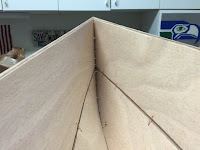
Below, the opening has been cut out. You can now see the temporary former at the back.  Now we can remove the temporary form and glue in the hatch sill, spacer, and rim.  These 3 pieces will come together to form a strong platform for the hatch cover to sit on, forming a water tight seal for the back compartment.

Friday, December 25, 2015

13. Epoxy - No Turning Back

My son Deek was here for Christmas and was eager to lend a hand. He hesitated when I handed him the drill and told him to make some holes for stitches, but I assured him he had a great teacher. He drilled away. We separated the stitched hull from the deck then got to tweaking to eliminate even the smallest of gaps between panels. Then the joints were tacked between stitches with thickened epoxy. Before the epoxy is set, the deck and hull were rejoined and restitched together. It went very smoothly have Deek working one side and me the other at the same time. Once alignment was verified the stitches were tightened. Had to ensure that we DID NOT glue the halves together. We were super fussy about alignment since once the epoxy is set there is no going back. Now we just let the epoxy harden. Will be taking a break over the holidays so this is a great stopping point.

Tuesday, December 22, 2015

12. Deck & Hull Come Together

The deck is fully stitched on to the hull at this point. All seams are checked for alignment and every stitch is checked and tweaked to get perfect lines. The only parts not on the kayak now are the combing and combing spacers.  Here's a bonus... In the top picture you can see my TV.  Big deal, right?  Well, since this is a smart TV I can fire up you tube and watch Wood Duck build videos if I need to!  So far I am just watching fail videos, but you see what I mean.
Mo & Ang

11. The Deck!

The deck has been wired together and flipped over on the hull. Still needs some tweaking and tightening but I am floored that we are to this point in the build. I got shaky with adrenaline when we put it in place. Wow wow wow!!!!!! The deck will next be fully wired to the hull and then will let the whole thing sit for at least 24 hours. Then it will be epoxy time!!!!

10. Hull Closed & Deck Stitched


The ends of the hull have come together. The stem was fairly easy and straightforward. The stern was another story. Trying to wire the transom into 4 other pieces was a little more difficult than expected but it worked.

Above shows the deck wired together, upside down on the hull. This was supposed to be the easy part....  Ended up with some wonky curves and very strange stress points.  Once my helper returns we will flip it over and adjust wires to bring it in to shape. I hope.

Monday, December 21, 2015

9. Sides Stitched On


The sides have been stitched and the ends are nearly closed. These were much easier to align and stitch than the bottom panels. The curves and twists are more gentle. It's either that or we are quick learners, probably a combination of the two.  This picture also shows the new Styrofoam blocks to support the kayak on my work bench.  This give us clearance to work under the boat with easy access to wires on bottom.  The big advantage is providing a super stable cradle for the boat to sit in, eliminating the annoying rocking back and forth we dealt with yesterday.  Fortunately I was smart enough to trace full size patterns of the hull forms in cardboard prior to wiring them into the hull.  Then transferring the patterns to the Styrofoam blocks made for a perfect support fit.  One drawback to be aware of... even after vacuuming the work area I still have a few little white beads static-clinging about.  Will have to make sure that none of these find their way in to the epoxy or varnish down the road.


Above you see the stern almost closed, with the transom ready to be wired. Today proved that copper wires stitches are sharp and will draw blood. Gotta love it!
Mo & Ang

Sunday, December 20, 2015

8. Bow Ends Meet

This pic shows the bow pieces mated perfectly. This is significant as this is one of the most difficult points of the build. On a lot of blogs and websites you will see that folks actually break or crack the wood in trying to achieve the multi twist and end union. Following some great advice, we wired the bottom but just pulled the stern and stem towards each other using plastic wrap. Then sprayed the ends with water. Three hours later we wrapped once again while pinching the ends together. The ends mated PERFECTLY and easily. No cracks, breaks, or undue stresses. Worked like a dream.
Mo & Ang

7. Stitching and Forms

Now this is starting to look like a boat! Hull bottoms have been stitched together and hull forms attached. Above left shows detail of stitching. The bottom pic shows the forms in place. There is a crazy twist at the front. Would never believe you can do this with wood.
Mo & Ang

Saturday, December 19, 2015

6. Panel Edge Bevels

All inside edges have been beveled. This ensures a tight fit when the panel edges meet. Also provides the proper surface to ensure a strong bond by the epoxy. Taking your time is key here. The intent is to get the proper angle without gouging into the outside layer of plywood.
Mo & Ang

Friday, December 18, 2015

5. Everything Stuck - Good Sign

At this point all of the hull joints have been glued with epoxy. You will see the weights on top of the strake joints as well as the clamps on the deck joints. I used w 2x4 to hold the joints in place. Had to be a little creative due to space constraints. All will be ready and cured to continue assembly tomorrow morning. Preliminary checks show that I did it right. The joints that are about 22 hours old are solid and super clean. I may have used a little much epoxy but by joint 4 and 5 I was lean and mean. You learn quickly in the build.
Mo & Ang

Thursday, December 17, 2015

4. Joining Hull

The hull pieces are joined, making short pieces into long ones. The puzzle joints are very precise. Slathered with epoxy and then taped with fiberglass on one side. 24 hours from now and this should be super strong. Completed 4 joints tonight, need to do two more tomorrow to have all hull joined.  This certainly a learning curve.  Nice thing, using a slow epoxy hardner which gives you time to work with the wood.  Goal is to take are time to make sure everything is neat, tidy, and correct.
Ang & Mo

Monday, December 14, 2015

3. Hull Preparation


The first legitimate work is underway.  Wanted to show several different aspects of hull plank (strake) preparation.  Work at this point is relatively delicate so taking your time pays off huge dividends.
(1) The CNC routers leave little nibs here and there.  I used a Dremel tool to remove the bulk of it but sand the nib flush by hand.  Be careful, the Dremel will burn the wood immediately.
(2) With bulk removed a few strokes with a tiny sanding block is all it takes to finish up. The little burn you see is from the factory, not my work.
(3) Talk about delicate pieces... these will form the tip of the bow and stern.
(4) Close up of the puzzle joints which will be epoxied together to form the full strake, stem to stern.
Mo & Ang

Friday, December 11, 2015

2. Inspection Complete

All parts unpacked and inspected for damage. All is perfect, CLC did a great job on packaging the parts. Even got to start on some sanding. The router leaves littles nibs which are easily removed with just a few strokes of sandpaper.
Mo & Ang

Thursday, December 10, 2015

1. The Important Bits

First look at the Okoume mahogany plywood. In the foreground you see what will become the hatch cover. Along the sides are the hull strakes and on the bottom are the Sapele deck pieces. In the middle are the makings of the seat as well as the fiberglass. Now to get to stitching.
Mo & Ang

The Kayak Has Arrived!

The kayak has arrived. Yes, inside this 8' long box is a kayak waiting to be brought to life. All the pieces to make a 12' long, 30" beam kayak. This is starting to feel real. Just ask me how real it feels when the work gets underway. Next up: the unboxing.
Mo & Ang

Wednesday, December 9, 2015

The Adventure Continues...

Not much of an update... but the Kayak kit from CLC will be here TOMORROW!!!  Cannot wait to begin the build as early as tomorrow after work. First the unpacking, then the joining, then the beveling, then the, then the then the...  WE ARE SO EXCITED!!! Look for a real update tomorrow,
Mo & Ang

Thursday, December 3, 2015

Kayak Has Shipped!


Are we ever ready for this! The excitement has been building. The garage is ready, all the extra tools are in place, now we just need some wood, and fiberglass, and epoxy, and ... Well you get it. Pretty soon we will dive headlong into this adventure!
Mo & Ang

Monday, November 23, 2015

Bench Drawing

This is the drawing I created to build the benches. Helped tremendously in visualizing how the pieces fit together. I love this stuff!

Friday, November 13, 2015

Small Bench Done!

Finished the small bench this morning. Complete with casters. Still need to add casters to the big bench. These babies are going to be the perfect platform to build a kayak on!

Wednesday, November 11, 2015

Workbench Finished!

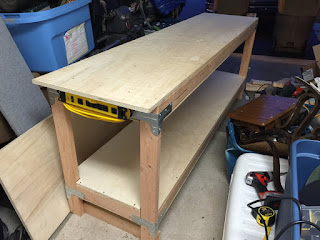
The 8' workbench is complete, even has an installed power strip. Now I can build the 4' bench using the big one rather than crawling on the cement floor.
Wife: "What are you gonna ever use that bench for...?"
Husband: "Build more benches!"

Tuesday, November 10, 2015

Bench Parts Cut

Ready for Assembly. I am using Simpson pre-fab metal tie connectors. Super strong.

Bench First... Then Boat

If you're gonna build a kayak you gotta have a solid workbench to build it on. Here are my raw materials. By tomorrow I will have an 8' bench and a separate 4' bench. Beauty is once the boat is done, these babies will remain in my man cave!


Sent from my iPhone

Thursday, November 5, 2015

The Goal...

This is a picture of the finished product.  We are building a Wood Duck 12 from Chesapeake Light Craft.  They are a wooden boat company located in Annapolis, MD.  We also considered a Pygmy boat, which our friend built, but maybe for the next one. We got to paddle the real deal up in Madison, WI a few months ago when the CLC guys were on their road trip out to California and Seattle.  These kayaks absolutely rock.  They track straight, are super stable, and are fantastic for those new to kayaking like us.

The First Step is the Toughest...

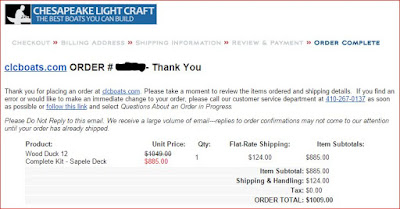
From the first time I laid eyes on a hand built wood kayak I was in love.  The beautiful woodwork, outstanding craftsmanship, and end result had me.  Having just gotten our first kayaks, my wife and I were smitten with our new adventure.  Building our own kayaks was taking things to a whole new level. After months of research and finally getting to paddle one of these we made the decision, it was time to build our own.  We saved our pennies for a while and finally placed the order.  Can't wait until the kit arrives! BTW... I have the MOST supportive wife on the face of the planet.